Categories
extensions mac_os_x

Show or Hide File Extensions on the Mac for one file

You already learned how you can show or hide file extensions for all files on Mac OS X. Now let me show you how you can enable the visibility of the file extension for just one file:

  1. Select the file within Finder or your Mac OS X desktop for which you want the file extension to be visible (or not visible).
  2. Now right-click (or Ctrl-click) the file, and choose the Get Info option from the resultant menu.
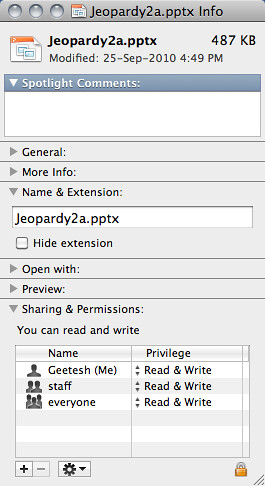
  3. This opens the Get Info dialog for that file, as shown in Figure 1, below.

    2011-07-29_1058
    Figure 1: Get Info

  4. You’ll see the Name and Extension pane within the Get Info dialog — here there is an option to check — it’s called “Hide extension” — if you want to show the file extension, you will uncheck this option — and keep it checked, if you want to hide the file extension. Checking or unchecking this option overrides the global settings to hide or show file extensions in Mac OS X.
Categories
extensions finder mac_os_x

Show File Extensions on the Mac for all Files

One of the biggest pain points for those who get started using Mac OS X after coming from a Windows world is that you cannot really see file extensions in OS X’s Finder. Many of these Mac newbies believe that there are no file extensions at all on OS X — but that is simply not true.

You can enable file extensions to show on Mac OS X on a global scale for all files, or for just a particular file. In this post, you will learn how to enable the visibility of file extensions globally on OS X — I am using OS X 10.6.8 (Snow Leopard) but this process works similarly on other iterations of OS X:

  1. Minimize all open windows so that you can access the desktop. Click on an empty area of the desktop so that no other application window is active.
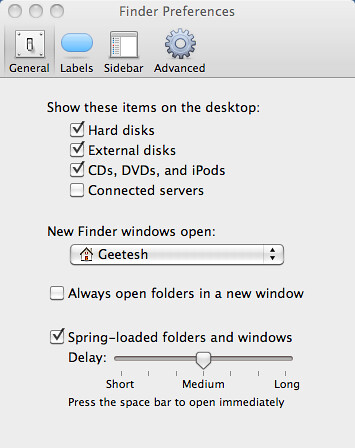
  2. Select the Finder | Preferences menu option — this opens the Preferences dialog as shown in Figure 1 below.

    2011-07-29_1029
    Figure 1: Finder Preferences

  3. Then click the Advanced tab so that your Preferences dialog looks like what you see in Figure 2, below — make sure you check the option that says Show all filename extensions.

    2011-07-29_1045
    Figure 2: Advanced tab of the Preferences dialog

  4. That’s all you need to do. Close the Preferences dialog, and all your files will show extensions. In fact, all your applications (in Finder’s Application folder) will also now show the .app extension!

Did you want to show or hide a file extension for just one file? Yes, you can do that too.

Categories
app_store apple download mac_os_x

Mac OS X Lion: Pausing and Resuming the 3.74 GB Download

Is it just me, or did you all find that it was not very intuitive how you could pause the Lion OS download from the App Store, and then resume it again. Even in today’s always-connected-with-a-fat-data-pipe days, 3.74 GB is not a very tiny download size!

I found a quick way, and wanted to share it with everyone else — so this is what you need to do — I am assuming that you have already purchased Lion on the App Store, and your download is proceeding, as can be seen within the visual indicator you see below the Lion icon on the Dock, as shown in Figure 1 below.

Lion Download Visual Indicator on the Dock
Figure 1: OS X Lion Visual Indicator

OK — let me assume that I want to pause this download now, and shut down my Mac. Actually pausing is easy right from the icon on the Dock — I can hold my mouse over the icon, and choose the Pause option from the resultant menu — unfortunately, thereafter you will find no Resume option in the same menu!

So this is what you do:

  1. Choose the Apple Menu | App Store option to launch the App Store app.
  2. Once App Store launches, click the Purchased icon on the top toolbar as shown in Figure 2 below. You will see the active downloads, including the OS X Lion download — click the Pause button towards the right of this download. Exit App Store, and shut down your Mac if required.

    Pause Lion Download in the App Store
    Figure 2: Pause your OS X Lion Download

  3. When you have started your Mac again, and are ready to resume the OS X Lion download, just access App Store again, and click the Purchased icon. In the resultant window, you will notice a Resume button along with a message next to it that says “0 of 0 bytes”, as shown in Figure 3 below. Don’t get appalled by the “0 bytes” message — go ahead and click the Resume button.

    Resume OS X Lion Download
    Figure 3: Resume the OS X Lion Download

  4. You may be presented a dialog that asks you to sign into your Apple account now, as shown in Figure 4. Enter your username, password, and click the Sign In button.

    Sign in to continue your OS X Lion Download
    Figure 4: Sign in to the Apple App Store

  5. The download will resume again, until it completes.
Categories
facebook phones twitter windows_mobile xbox zune

Windows Phone 7 Series

Microsoft announced and showed the new Windows Phone 7 series at the Mobile World Congress in Barcelona.

Tons of new features, and a whole new approach make this a very awaited product to watch out for — there’s a little of Zune, so much of Facebook, and Twitter — and of course even the XBox. It looks like Microsoft is pulling no stops this time around to make sure that this product has the aesthetics and the functions that users want. It will be interesting to see what impact this has on Apple’s future plans — meanwhile this cool video has a lot going for it.


Get Microsoft Silverlight

Categories
pictures email web_applications utilities

PicturePaste: Paste Pictures into Gmail, Hotmail, etc.

One of the frustratons of working with web based programs including email apps like Gmail, Hotmail, etc. stems from the fact that you cannot paste pictures from say your Word document or PowerPoint presentation into a Gmail message that you are composing.

With web based applications becoming more common-place, this sort of clipboard access option becomes more of a necessity. That’s why I was glad to see this new company called PicturePaste that has developed a product of the same name.

PicturePaste

Once I downloaded and installed the program, I was able to launch PicturePaste. This showed up as a small window. I then opened a PowerPoint presentation, and copied a picture from one of the slides — this automatically showed up in my PicturePaste window as you can see below.

Using PicturePaste

You now click the Convert button within the PicturePaste window — after a while, you see a box that can be dragged to your Gmail compose window as shown in the figure below.

PicturePaste to Gmail

That’s all you need to do!

There are two versions of PicturePaste — the free version works with 50 pictures, and the Pro version works with more than 50.

Categories
quicktime windows_7 windows_media_player

Small Simple Windows 7 Stuff 01: QuickTime Playback

In the past few weeks that I have been playing with Windows 7, I have found many small and simple improvements that no one talks about! I’m guessing they are all talking about the big improvements.

The first of these small things is that Windows Media Player now plays QuickTime MOV files, even if you have no QuickTime Player installed! Wow — who saw that coming?

Now — too be not too patronising, Windows Media Player did throw fits while trying to play one of the movie files I asked it to play — but it did play many of them — look at the screenshot below!

Playing QuickTime in Windows 7

This should keep people who work with both Windows and Mac machines happy!

Categories
animoto fun movies video

Animoto Holiday Cards

Animoto, an online video editor that I have mentioned in an earlier blog post is coming up with holiday cards that are actually video clips you customize within the Animoto interface.

The folks at Animoto do say that the personalized holiday cards won’t be ready until December 1st — but they wanted to provide a sneak preview of the holiday greeting cards that they will make available later next month.

Animoto Holiday Cards

They also have a cool movie on their site that tells more.

Categories
Uncategorized

Apple’s New Nano Adds Video Recording and FM Radio!

Apple has done the impossible again! If you thought that the Apple iPod Nano music player was incredibly small, then think again because Apple has now managed to fit in video recording and a FM radio tuner within the new generation of the product without increasing its dimensions.

New Apple iPod Nano

It also has a larger screen than before, and the video recording part has built in video effects. The FM radio tuner has two killer features called Live Pause and iTunes Tagging — and to make the product even better, Apple threw in a Pedometer feature so that your new iPod Nano can count every step you take as part of your fitness program.

The new Nano is now priced at $149 and $179 for 8GB and 16GB models respectively, and that is actually $20 less than the last 16GB Nano model.

Categories
about

About Techmazine

Techmazine has been conceptualized for a long time to fulfill the need for a tech blog site that doesn’t assume that a reader knows everything — so each post in this blog site will contain references and links to explanations of terms you might not understand. Think of this as a blog that everyone can read and understand!

Categories
microsoft retail

Microsoft Retail Stores — First Opening at Scottsdale, AZ and Mission Viejo, CA

Microsoft may be opening their first retail stores, a la Apple Stores as early as this fall in Scottsdale, Arizona and Mission Viejo, California. No word is available yet about any store launches outside the US but according to eWeek, the Mission Viejo store will open at a mall that includes a successful Apple Store. The Shops at Mission Viejo is an upscale mall that I have visited often during my US trips in Orange County, south of Los Angeles.